

Docker is a platform for developing, shipping and running applications inside of containers. A container is a lightweight, portable and self-sufficient environment that isolates applications to ensure that they run consistently throughout the development lifecycle. Docker containers are used by a wide variety of software developers because they can isolate their development environment from the host system, which prevents conflicts with other software or system configurations. What this means is we can work in an environment tailored specifically to Business Central Development that we know will be consistent.
With updates released quite frequently, we need to be able to quickly have access to multiple different versions of Business Central. Docker containers can easily be shared across different machines, which reduces the setup time for new resources on a project, or worrying about who may be working in a sandbox. When it comes to testing, containers are easily used with Continuous Integration (CI) and Continuous Deployment (CD) pipelines. Development changes are automatically tested and deployed to environments using scripts, which also serves as a deployment log.
So let’s dive in to how to setup a Docker development environment!
Docker Quick Start Guide
1. Install Docker Desktop
The first thing you will need to do is download Docker Desktop, which you can get here
2. Enable Hyper-V
When Docker is installed, the default is to run Linux containers. We need Windows containers, and in order to use them we will need to enable Hyper-V.
You will need to run Windows PowerShell as an Administrator, and run the following command:
Enable-WindowsOptionalFeature -Online -FeatureName $("Microsoft-Hyper-V", "Containers") -All
3. Install BcContainerHelper
Still inside Windows PowerShell as an Administrator, we need to get all of the commands that will help us when working with Business Central containers. Run the following command:
Install-Module BcContainerHelper -forceIf you get a popup, click Yes to install.
4. Reboot your PC
At this point you need to restart your machine (due to the Hyper-V installation)
5. Switch to Windows containers
You will want to make sure that Docker is running. In the right-hand corner (near your clock) you will find the arrow to display your hidden icons. This is where the Docker whale likes to hide. Right-click on the whale and select “Switch to Windows containers“
There are two types of artifacts: Sandbox or OnPrem. What are the differences?
Sandbox artifacts are multitenant by default, meaning they can support multiple tenants or customers. In contrast, OnPrem artifacts can only support a single tenant or customer. Sandbox artifacts are considered Software as a Service (SaaS) aka a cloud environment. If you are developing for a cloud environment, you will want to use a Sandbox container. We have to remember that there are different artifacts, code bases, and even different demo data that is used for SaaS vs OnPrem.
To get the most recent artifact URL, open PowerShell and run the following command:
Get-BCArtifactUrl -type 'Sandbox' -country 'us' -select LatestSandbox artifacts are updated daily, while OnPrem artifacts are updated monthly. Don’t forget to grab the correct localization, as this varies as well.
If you are looking for the Public Preview of the next major release (at the time of publication it’s Business Central 2023 release wave 2 (October) use the following script:
Get-BCArtifactUrl -storageAccount BCPublicPreview -country usWhen you grab an artifact it will be placed in a folder on your C:\ drive called bcartifacts.cache to cache your artifacts (aka save the image(s) for later). If you create a container that reuses an artifact you have already downloaded, the initialization goes a lot faster.
Spin up your first Docker Container
The fastest and easiest way to create a new Docker container is to utilize a Wizard that will walk you through several setup options. All you need to do is run the following script (within PowerShell, as an administrator):
New-BcContainerWizardTo start using the wizard, you must first accept the Eula (End User License Agreement).
I would suggest creating your first container with the following parameters.
- Choose local container
- You will want to use Username/Password authentication.
I would suggest going with the default selection that gives you a username and a predefined password.
If you go with the option for Username/Password (without any pre-defined username or password) you will be prompted to enter a username and password at the time of container creation - Choose a container name (since you will more than likely be creating more than one)
- Use the latest Business Central Sandbox (unless you know what specific version you need to use)
- If you do not have a country preference, choose US
- If you are planning on creating Automated Tests, install the Test Framework and Test Libraries
- You can skip the Performance Toolkit at this time
- You do not need a premium plan at this time
- Test users are not required
- AL BaseApp development is not required
- Use language extension provided with a container (so answer no for using the marketplace AL extension}
- You do not need a custom license – you can leave it blank
- Use the Cronus demo database inside the container so you will have some data to play with
- Use multitenant
- Use default DNS settings
- Do not use SSL (use http)
- Allow the ContainerHelper to decide which isolation mode to use
- Use the default option for memory limit (leave it blank)
- You can save the script so you can reuse it to create your next container
- Now execute your script!
Within Docker Desktop you should now see your new container running. When you click on the name of your container you should be able to see the output of the script, which gives you information about connecting to your Docker container.

The WebClient is the URL you will use to access Business Central.
How is the URL structured?
http://containername/serverinstance/?tenant=tenantname
If you setup your container to be multitenant, you will want to ensure you have the last part of the URL ?tenant=default.
Verification
From within Docker Desktop I was able to click the web client link, enter my user name and password, and Business Central was ready to go!
In the upper right-hand corner is the ? icon for Help.
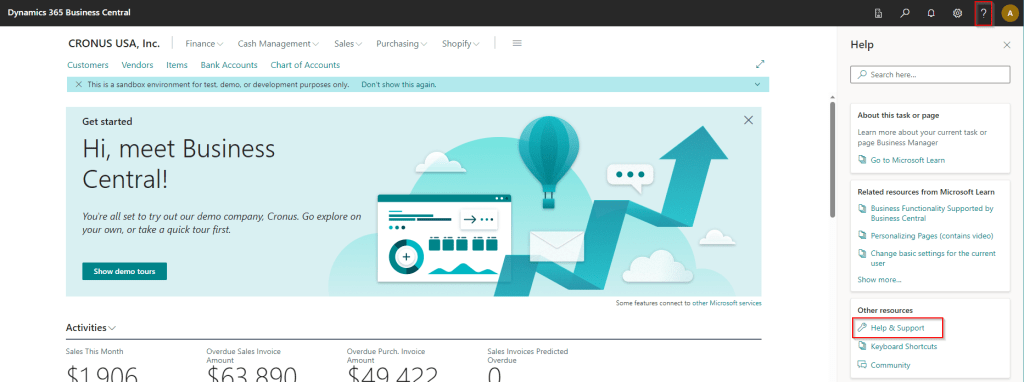
If you click “Help & Support” you can find the current version of Business Central you are running.

Please note that the setups noted here are guidelines to get you started working with Docker Containers with Microsoft Dynamics 365 Business Central. As you become more comfortable creating containers, and need to make adjustments to support your development goals, it may be beneficial to change properties when creating your container, and/or create your own Docker script(s).
This blog post wouldn’t have been possible without the following community contributions:
Stefano Demiliani’s post exploring Sandbox vs Onprem Docker containers
Freddy Kristiansen is the Godfather of working with Docker containers and Business Central. Here are his Docker blog archives that still have some relevant nuggets of information.
Microsoft Learn documentation on Running a Container-Based Development Environment.
#msdyn365bc #businesscentral #bcdevelopment #docker

[…] If you are planning to work with Docker containers (which I address here) it’s really helpful to run your scripts right from VS […]
LikeLike
One of the first commands you list is “
Install-Module BcContainer -force“Should be “
Install-Module BcContainerHelper -force“LikeLike
Thank you for calling this out! I have updated the post.
LikeLike