

So you want to develop custom code for Microsoft Dynamics 365 Business Central? The code for BC is written in AL, which stands for “Application Language”, and is a specific language only used for Business Central. To start writing AL code, you need to make sure you have Visual Studio Code installed, along with the AL Language extension for Microsoft Dynamics 365 Business Central. If you need more information on setting up your development environment, check out this blog post. At this point, we are ready to create our first AL project!
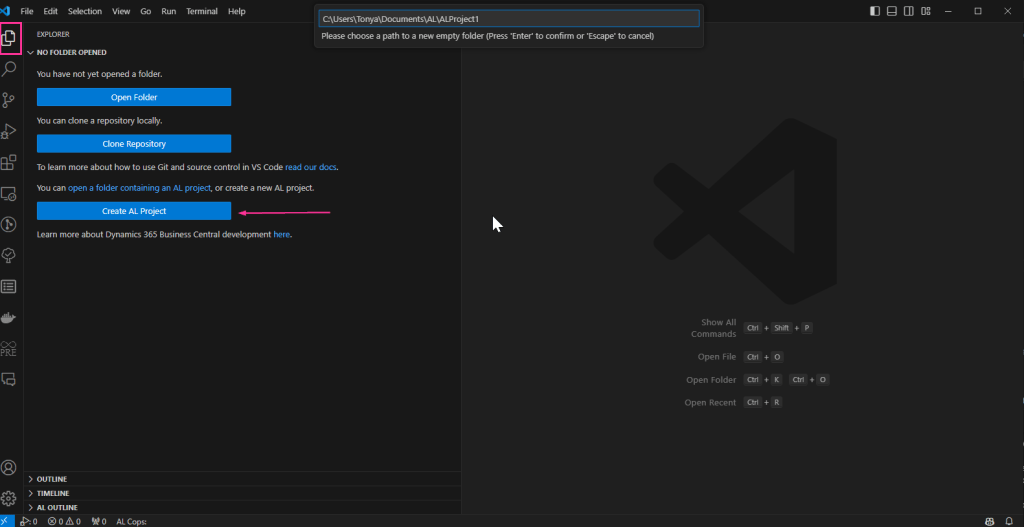
It’s really easy to get started. Make sure you are in the “Explorer” (so the first icon on the left) and click “Create AL Project”. You will be prompted as to where you want to save your AL project. This defaults do your Documents folder.
You will then be prompted to pick the version of Business Central you are working with. By selecting 13.0 I am saying I want to work with BC24. This information will be populated into your app.json, which is used to help package your customizations into a compatible app for your environment.
Connecting to a Sandbox Environment
The next question is how you are connecting to your environment.
Your own sever – this is used for On-Premise installations or a Docker Container.
Microsoft cloud sandbox – this is if you are working with a Sandbox within your tenant.
If you need some guidance connecting to a Docker Container, check out my tips for Connecting to a Docker Container here
The launch.json that opens is the file that connects you to your environment.
If you cannot find your launch.json, it will be located within your .vscode folder.
There are a few properties you will need to update.
For Sandboxes:
– Add a property for “tenant” and set the value to your Tenant Id. You can find this in the URL you use to connect to Business Central.
– The “environmentName ” can also be found in your URL.

Some of these other properties are defaults, and just help VS Code identify we are working with an AL Project.
– “environmentType” will always be “Sandbox”
– “type” will always be “al”
– “request” will always be “launch” (as we are launching Business Central)
Other properties will help you in your development journey.
– “startupObjectType” specifies if when publishing from VS Code, you would like to launch a specific object type. Your options are Page, Query, Report or Table.
-“startupObjectId” specifies the specific object Id that should be launch (and corresponds with the startupObjectType.
💡 Your launch.json may have defaulted to a startupObjectType of Page, and startupObjectId of 22, meaning when you launch Business Central from VS Code, it will open the Customer List Page.
Download Symbols
When you download symbols, you are downloading the metadata of the objects within that environment to gather information about the tables, pages, reports, codeunits and more that are in that environment. This metadata, or symbols, is necessary when extending and customizing Business Central.
To generate symbols, you will want to open the Command Pallet within VSCode by hitting F1. You will then want to type “download symbols”.

You should see the AL Command. If not, you will want to verify you have the AL Language extension for Microsoft Dynamics 365 Business Central installed within VSCode.

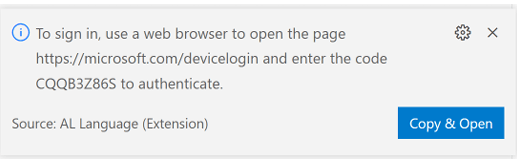
When downloading symbols from a Sandbox environment, you may receive a pop-up in the bottom right-hand corner asking you to login. You need to login with credentials that have access to that Sandbox environment.
You will know you have successfully downloaded symbols when your .alpackages folder has .app files inside of it.
How to Publish your App
To publish your first extension to Business Central, you will want to open the Command Pallet within VS Code (F1) and then search for AL: Publish with Debugging (otherwise the shortcut is F5). By publishing with Debugging, you can set break points within your code, and walk through the AL Code. As you debug, you will be able to not only see your code, but the Microsoft base code, and apps that are installed and allow debugging.
There is another option for AL: Publish without Debugging (Ctrl + F5). This will deploy your latest changes, but will not launch the debugger.
A few more things to know…
When you publish an app from Visual Studio Code, it installs your extension as a DEV extension. DEV Extensions can only exist in Sandbox Environments (or Docker Containers). Essentially, you need to know that DEV extensions will never exist in a Production environment. DEV extensions are uninstalled when a Sandbox environment is upgraded (but the data is not removed).
If you would like to install your extension in a Production environment, or have it be more “permeant” in the sense that it would not be uninstalled from a sandbox during an upgrade, you would need to install your extension as a “Per Tenant Extension” aka PTE. PTEs are unique per environment, defined by their app id, version, and environment where they are deployed. You would install a PTE by visiting the Extension Management page in Business Central where you would upload the .app file.
You can learn more about Extension types and scope here
What else would you like to learn about as you are just Getting Started developing for Business Central?
#BusinessCentral #msdyn365bc

Hi Tonya,
Amazing read on your blog, I’ve stumbled across your webpage from dynamic user group.
I’m a new functional BC consultant aspiring to growth in this specialised career path. Connected with you on Linkedin for inspiration in this journey
Sam
LikeLike